Friday, January 28, 2011

Sew Lucky!

I have totally been holding out on you! I don't know where the time has gone but we made the kids some super Christmas Gifts that I have yet to share...but first I will start with this week's project...Please take a moment and notice that I switched up my thread for this project...to pink and black...it took some time...
After much debate we went with the black sleeves...and then added the pink ruffles. They were inspired by this dress. I might try appliquéing like that...I think I have just the shirt to do it with!

For Christmas...Sarah got a bed for Taryn her Maplelea Doll. A Maplelea Doll is much like an American Girl but the Canadian Version.
Mr CB designed and made the bed...then it was up to me to create some bedding to go with it.
The Quilt is reversible (of course!)
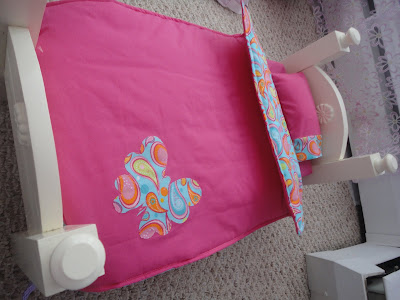
Oh and I finally recovered her chair to match her room as well...I originally made this chair for Sarah years ago...
I am going to admit it here and now...I am totally living vicariously through Sarah and her girliness...I hope that she never holds it against me but she's just so fun to make things for!

But I promise, I will come back with what we made for the boys really soon! (Simon is currently napping so I can't take photos!)

Enjoy!
Heather

Tuesday, January 25, 2011

Be Mine...


I am trying really hard to stay on top of this whole holiday thing...and well, any excuse to hang a new wreath on my door! I really wanted to make this wreath but I couldn't find a foam heart form and when Mr. CB saw what I was doing he stopped me...why not just leave the grapevine showing? We live in wine country...And as much as I hate it...I do have to agree...I kind of like it like this.
And I am really loving my black door too. What a sweet backdrop for my wreaths it makes.
Now I just need to get my Christmas decor down outside!

Enjoy!
Heather

Monday, January 24, 2011

Rock and Roll is here to stay...

When I was asked to make a cake for my niece's birthday I was delighted! Then I found out that she was having a Rock Theme...I was so excited! My first chance to create my take on the guitar cake! Then I realized I was going to have make strings...LONG strings. So, off to Google I went and discovered it was a lot easier done than said! Whew!I had so much fun making this cake...from the design and sculpting to the decorating. It took me a while to figure out who I was going to make the most of my 11x17 cake and still get a great guitar but after some brainstorming, I came up with the perfect plan.
And it worked! I had a very happy birthday girl...and not just because of the cake. I would have been pretty happy to celebrate my birthday in the castle with crafts, dress-up clothes and dancing that she had too!
It was a fabulous day!

Happy Birthday Rachel!
Love,
Auntie Heather

Sunday, January 23, 2011

Jean-i-ous Camp - Coming Soon!

I am SO excited! Time always seems to slip by and January has been no exception! I spent yesterday afternoon plotting and planning the best way to reuse an old pair of 6x/7 jeans...I wanted bang for my buck! I want to wow the girls that are coming next week...I mean WOW!

So, I started with the purse, then the bolster pillow (which is a PJ holder by day), next the kerchief...then I had one big piece left...not wanting to leave it out I made a half-apron!
Oh and let's not forget the shrug I made out of a t-shirt! I will be buying Sarah a tee for the workshop tomorrow while out shopping for embellishments!
Just look at that purse...it is just cuteness! Yes, this is the ribbon we will be belting the purse with but you can always change it up. I need a little spring in my step, don't you?
One last look.
Thinking about sending your daughter? Here are the details;
Date: Jan 31, 2011
Time: 9am-4pm
Cost: $35
Ages: 8+
Bring your own lunch. **Nut-free**

Lots of you have been asking questions about our upcoming workshop! I hope this helps answer your questions.

From the jeans we will make;
-half-apron
-purse
-bolster pillow (for storing pjs, can also be stuffed by you)
-kerchief

Jeans shouldn't be more than 1 size smaller than your daughter's current size to ensure that projects are appropriately sized.
Jeans can be embroidered or embellished.

t-shirt
We will use the t-shirt to make a shrug and embellishments. Shirt can be long sleeve or short sleeved and should fit your daughter.
Make it an older tee with stains or pick one up at your local Good Will.
The neckline doesn't matter but gathered sleeves would definitely add to the cute factor!

Embellishments will vary. If you have any embellishments that your daughter would like to use specifically please send them in with her!

We will be doing some light sewing and will have a lot of creating to do!

I have included a photo of my samples...they are not yet embellished but it gives you an idea of what to expect.

Enjoy!
Heather

Tuesday, January 18, 2011

Let's hear it for the girls!

You know...I was asked if I was going to share this cake on my blog and Facebook accounts by one of my young clients...you see this was her mother's birthday cake. My young client is also a friend of mine and of my children...she feared that some might consider the cake inappropriate coming from Creative Bug.

Well, if it weren't for mother's like this one (who happens to be a very good friend) I wouldn't have a successful business. I want to take a moment to celebrate my good friend's birthday. This cake was extra special as it was a new recipe...Chocolate Irish Cream Cake with Irish Cream Icing. Yum!
My friend, who has ordered a number of cakes from me assured me that this was likely the best yet...

So, thank you. I appreciate each and every one of my clients...you all make the wheels on this Creative Bug turn.

Enjoy!
Heather

Sunday, January 16, 2011

One Elephant Went out to play...

Am I the only one who sings songs based on what they are doing? Do you know the Sharon, Lois and Bram song I am referring to above? Maybe I should have stuck with 'An Elephant Never Forgets'. I am sure the recipient of this cake was not going to forget that she was due a 'special cake'!

I have a friend who I chat with on-line...she let me know oh, I would say in July that she wanted to order a cake for her mother's 50th birthday. Her mother had made it clear that her cake was to be special...initially the request was for a camping, mountain biking cake with an elephant on it...I had an idea and it may have worked...but then my friend saw my Zebra Cake. And who didn't love that cake??? So, she asked if I could make an elephant one like it. I rarely turn down a challenge or turn a customer away for that matter...so I started dreaming of elephants...

Then the baking began...rather than fight with cake to make the trunk I used rice krispies treats and moulded it right onto the cake. I don't know if that's the right way to do it...I don't watch Cake Boss or any of those other shows...I just make it up as I go along...and I moulded the ears while I was at it using a cake pan as the form.
Then I covered the trunk, made my tail, tusks and other accessories...
And here he is...my friend the elephant!
I hear he was a hit! The guest of honour loved him...I hope you do too!

Enjoy!
Heather

Saturday, January 15, 2011

Happy Festivus!

So, I know Festivus has since passed and this cake is actually from last year...but I haven't blogged about it so I thought I better share it with you before the spring! ;)

First, an introduction to Festivus;


I had just watched the video then a few days later I was working on a cake for one of my clients...We hadn't decided on the finishing touches...only the martini glasses as they were having their 'Annual Boxing Day Martini Bonanza'. Seemed like a bit much for a cake...

Then I got a call...my client wanted to come get the cake! I reminded her that we had no words so after a short discussion it was decided that the cake should say Happy Festivus (in red and green as per her daughter).
So, I set to work. I had a lot of fun with this cake...sweet and simple.

Enjoy!
Heather

Friday, January 14, 2011

A little something to share...a give away!

Sew...when I was trying to decide what to get for some of the most important people in my life, well, a few of the women at least...I thought long and hard. I had been planning for sometime to get them each a copy of The Happy Baker but I wanted to make their gifts special and memorable like themselves...

Then, I found this pattern. Created by Sew Liberated, it is a fabulous, flattering apron that is fairly easy to put together (the directions are totally fabulous!) I ordered the pattern on-line and waited...and waited...and waited...after 3 weeks I started to get worried so I e-mailed them. We gave it another week and still nothing so they sent another copy of the pattern Priority post.

Finally, I got my pattern with only a few weeks to spare before Christmas. Without much thought I set to work. I chose my fabric and made 3 aprons assembly line style...I am not a fast sewer and I had other work to do...in all it took me about 5 days to make 3 aprons. I was thrilled!
I love the fabric, I love the pattern...and argh! I didn't make one for myself!!! In fact, I didn't have enough of all the fabrics to do it...oh well...Then what do you think happened? I went to pick up my copies of The Happy Baker at the Post Office and guess what was there!!! The second copy of the Emmeline Apron Pattern!
In the meantime I carefully wrapped the cookbooks with the aprons and brought them to 3 beautiful women I know...they all loved their gift. Each of their responses was enough gratification to pay for my work...I love each of these women...they are all very special to me and have helped me in their own way.

Anyway, back to that extra copy of the pattern...I still have it! In fact, Sew Liberated has given me permission to share it with one lucky reader! Sew leave a comment and this beautiful pattern could be yours! Become a fan or mention that you are a fan in an additional comment and you will be entered a second time.

Contest closes January 31st at midnight. Will ship pattern anywhere in Canada or the United States.

Enjoy!
Heather

Thursday, January 13, 2011

T'was a busy day!

T'was the day before Christmas...and all through the workshop not child was stirring...at least not yet! The chairs were set up by the tables with care in hopes that the children soon would be there! I in my apron and Mr CB in his too had just settled down for a minute or two...when at the door we heard such a clatter, we knew it was time, we knew what was the matter!
The children had arrived to create such goodies as tiny reindeer, sleigh bells and sugar plums! They hung their stockings after creating their chimneys.
They carefully saw to every last detail!
Then madness it struck in our final few moments. We pulled it all together and sent them off wishing them "Merry Christmas to all and to all a good night!"
I'd like to explain some of the details the kids added to his gift bag here. Like the carrots and cookies on the mantle. And the various brick patterns. They got very creative with their work. We sure had fun...well, I know I did anyway!

Enjoy!
Heather


Wednesday, January 12, 2011

I want candy!

Well, not really...I just cleared out most of my cupboard of the Christmas Candy the kids got...they have forgotten about it and I prefer not to remind them. But there was one thing left. Half a pack of candy canes...so here's what we did. First I found a willing participant!
And I set him to work. I put 3 candy canes in a baggie and gave him a rolling pin. I highly suggest doing this on a cutting board as if you do it on your kitchen table you might leave some marks...just saying!
Make sure your helper is armed with the best tools available...then get your helper mixing! Dry ingredients, then the wet...this is when a hand held mixer would come in handy...I asked Mr. CB for a little old-school hand turned mixer or a drink mixer for my muffin batter but it has yet to arrive so we used a whisk...Add you chocolate and well, your helper might pout when they don't get to eat the batter...
So, I highly suggest bribing them with other cookies that happen to be on hand...well, they were on hand! Divide your batter into 12 muffins and top with candy cane crumbs.
Bake!
Peppermint Chocolate Chunk Muffins

2 cups all-purpose flour
2 tsp baking powder
1/2 tsp baking soda
3/4 cup Redpath Granulated Sugar
2 eggs
1/2 cup vegetable oil
1 tsp peppermint extract
3/4 cup yogurt (we used soy yogurt, you can also use sour cream)
1 cup chocolate chunks
6 candy canes or red and white peppermint candies, crushed

Preheat oven to 375F
Spray a 12-cup muffin tin with cooking spray

In a large bowl whisk together flour, powder and soda.

In a large glass measuring cup, mix together oil, yogurt, sugar, eggs and peppermint extract. (I always measure my wet ingredients directly into my glass measuring cup to cut down on dishes.)

Add the wet ingredients to the dry ingredients and stir until blended. Add chocolate.

Fill each muffin cup with approx 1/4 cup of batter (I use my measuring cup to help keep my muffins even). Top with candy crumbs.

Bake in preheated oven for 16-18 minutes or until a toothpick inserted in a centre comes out clean. Cool.

*Adapted from 750 best muffin recipes by Camilla V. Saulsbury

I will be serving these with hot chocolate when the kids get home from school...I bet they are cold and wet after playing in the snow at school!

Enjoy!
Heather

Tuesday, January 11, 2011

Sew Sorry!

I have been around...really...and working too, I swear! If you follow me on Facebook you would see that I have been baking quite a bit but I just realized the other day that it's been 2+ weeks since I last blogged! Oops! Again...sorry!

Over the holidays, I did some fun stuff for me...I finally took some time to learn how to use that serger that has been living here! I made some shirts for the boys.

This was the first one...it was for Sean...
Then I made this one for Sean and while I was doing that, I was working on the next one for Simon.
Simon was SO impatient! You see I had already finished something for both Sarah and Sean and nothing for Simon yet. He actually told me (non-verbally) to get back to work on it...soon I had to quit my assembly line style of work and just get his shirt done. It was pretty funny!
The boys love their shirts! I had a hard time getting Sean's into the laundry! He was quite pleased to see them back in action after I finished folding the laundry today! Oh and take a moment to appreciate the details on the Bugs Bunny shirt...it had the silhouette and signature on the back of the original tee, I changed it up and put them on the hood and sleeve.

I had so much fun making these! Wait till you see what else I made!

Enjoy!
Heather